Tuesday, April 24, 2012

Super, Simple, Satisfying Salads: Edamame-Me Salad

After growing FAT and HAPPY over the past few years of marriage and dealing with some health issues I have gotten FED UP (no pun intended) and I started Weight Watchers a few weeks ago.  I have always loved salads, but let's face it, even a salad can be packed full of fat if it is not done right.  So for all of you others out there trying to watch your waistline and even for those who aren't, like my husband.  I am cultivating some new salad recipes that utilize SUPER foods, that are SIMPLE and also SATISFYING.

The first time I tasted Edamame *soybeans*, I fell in love!  I am a huge fan of "mouth feel" and these vibrant little morsels of green goodness, have a wonderful mouth feel that remind me of pasta al dente.  Add to that the mystery of their buttery but clean, fresh taste and you too will be hooked when you give them a try.

SOY GOOD! *OK, you knew I couldn't pass that up.

A local grocery store carries a edamame salad that I adore in their deli but being a penny pincher, when I find something like that, I am always challenged to come up with a home version.  What I really love about this salad is that it has the same flavor profile and mouth feel of pasta salad but a fraction of the carbs and calories.  Not to mention, it is LOADED with protein and is ready to eat in a whisper of the time it takes to make a pasta salad.

Edamame-Me Salad

What you will need:
  • 1~ 12 OZ. Package, Frozen Shelled Edamame (3.5 Cups)
  • 1~ C. Cherry Tomatoes, Halved
  • 1/4~ C. Feta Cheese Crumbles
  • 1/2~ C. Red Onion, Diced
  • 2~ T. Vinaigrette
  • Kosher Salt
  • Fresh Cracked Pepper

OK...are you ready? This is how hard this is!  *smile*
  1. Boil Edamame per package directions. 
  2. Shock *put into ice water* beans when done and let sit 5-10 minutes.
  3. Mix all ingredients together and give it a smattering of kosher salt and a few good grinds of pepper.  
Looks YUMMY! HUH?!

You can make your own vinaigrette or use store bought.  I am a huge fan of "Brianna's Blush Wine Vinaigrette" and that is what I generally use.  If you don't like a sweet vinaigrette try "Brianna's Classic Italian Vinaigrette".


LOVE "Brianna's" Brand Salad Dressings

That is it, it is ready to eat and or will store in the refrigerator for up to a week.

If you are doing Weight Watchers with me, each 1/2 C. serving has 3 pts. *if you use "Brianna's Blush Wine Vinaigrette"*and it is worth every point because it is full of protein and is satisfying as a side dish or quick snack grab.

ENJOY!  and please let me know if you have any questions on this recipe or anything "Cobwebs To Cookies" related!

I put a lot of love and time into my work and it THRILLS ME when people share my recipes and ideas!  As I try and grow my wee business I only ask that if you do share, that you also share the source.   THANKS SO MUCH!

Sunday, January 22, 2012

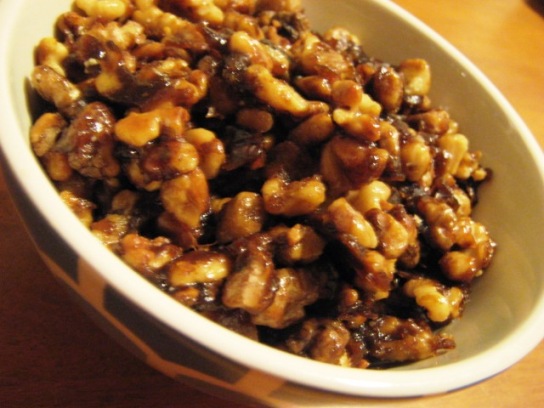
You'll Go Nuts!!!! ~Candied Nuts

I love nuts! Walnuts, Pecans, Brazil, Cashews....yup, pretty much never met a nut I didn't like! A really fun way to enjoy nuts and add protein to a green salad is by adding a sprinkle of nuts instead of croutons. Around our house, sunflower seeds, peanuts and candied walnuts or pecans are always on hand.

Candied nuts is what is on the agenda today. You are going to love these yummy, buttery, sweet and salty, candied walnuts or pecans. They really add a wow factor and punch up your salad. They also make a nice little sweet snack that will appease any sweet tooth attack.

OH! and another great thing, this wow factor topping, will take you less then ten minutes to make.

What you will need:
9" Saute pan
1 1/2 C. Raw Walnut or Pecans (Whole or Bits)
2 Tablespoons Butter
2-3 Tablespoons Brown Sugar (Dark or Light)
Kosher Salt or Sea Salt

How they're done:
Place nuts single layer in saute pan and cook 3-4 minutes on med/high heat stirring every 30-40 secs. (You will start to smell the aroma of them roasting..MMMM!)


Add butter to pan and stir to coat nuts.
When butter is melted, stir brown sugar into pan.
Let cook for 1-2 minutes stirring every 30 seconds until sugar has melted fully into butter and turned a delightfully dark amber colour.
Immediately pour nuts out onto glass plate or parchment paper and sprinkle with salt.
Cool, crumble and GO NUTS!

Tips for success with this recipe:
Using raw nuts is important. Nuts that have already been roasted have released most of their oils.

Heating your nuts before you add butter and brown sugar is also important. This brings out their natural oils and opens their "pores" allowing the butter and brown sugar to grab on.

Take your time but not to much time. This recipe goes quick and nuts burn easily. Be prepared to stand by your stove-top when preparing this wonderful morsels. Trust me, they will be worth it.

Switch It Up
A wee bit of Cayenne, Cinnamon, Allspice or Chile Powder can totally change your flavor profile and are fun variations on candied nuts. It just takes a whisper of any of these spices to add a fun layer of flavor.

Add a sprinkle of vanilla or some orange zest at the end of cook time.

Try different nuts. This technique will work on any raw nut, pecan and walnuts just happen to be my favorites in salads.

Use different salts as finishers. Smoked salt, flaked or sea salt...etc.

Need a quick birthday or hostess gift? These make a really fun and unique gift when placed in a bag or chinese food container and topped with a pretty bow!

Questions? Drop me a note! Of course I always love to hear what you think when you try one of my recipes. I welcome feedback and hearing changes or additions YOUR creativity brings to the table.

Please note that all recipes are original to "Cobwebs To Cookies". I love when my recipes are passed along and shared; but ask that you please respect the time and energy I put into developing them, by sharing this blog as your source if you do. Thank YOU!

Wednesday, January 11, 2012

Simply Scrumptious & Satisfying " Pasta Aglio e Olio"

What if I told you, you could make dinner in 15 minutes?

What if I told you, that dinner would be simple, scrumptious and satisfying?

What if I told you, this treat could serve 4 people for less then $3?

OK...OK! I will stop asking you goofy questions and just tell you.  *smile*

"Pasta Aglio e Olio"
Pasta with Garlic and Olive Oil!


Nothing beats a hot bowl of well cooked pasta and keeping it simple means this recipe can be ready in a matter of minutes.  Yet while simple with few ingredients, this dish rivals any sauced pasta dish that you could spend hours on.  Pair this dish with a salad for a complete meal or enjoy alone as a impromptu tummy pleasing late night snack.

What you will need:
  • 1 lb. of spaghetti or linguine
  • 1/2 C. olive oil
  • 8 cloves of garlic, peeled and minced
  • 3/4 C. freshly grated/shaved parmesan cheese
  • 1 tsp. crushed red pepper flakes (optional)
  • Salt and Pepper to taste

Sweet Basil Trenette from Pappardelle Pasta, Seattle


In large stock pot bring water to a boil.  Once water is boiling you want to add some salt to the water.  This will season your pasta as it cooks.  Add enough salt, so it tastes like the sea on your tongue. 

Add pasta to boiling water and stir.  When the water returns to a boil, start your timer (check time on your package for cook time as it will vary for fresh, dried, and whole wheat or gluten free pasta).  It is important to not let your pasta get over cooked.  I will admit that sometimes I don't use a timer when baking or cooking but with pasta I always use a timer. Give your pasta a twirl or two during cooking, this will help keep the noodles separated. 

While pasta is cooking, heat olive oil in skillet on med/high.  Add garlic and red pepper flakes then cook till garlic turns golden.  Remove from heat and set aside.

Drain pasta in colander, reserving a cup of the boil water (Do not rinse! Rinsing washes away the wee bits of starch that help your sauce/oil cling to your pasta) and then slide your noodles into a pasta bowl and toss with oil mixture (if mixture is a bit "dry" add some of the reserved boil water) and salt/pepper to taste .  Sprinkle with parmesan cheese and EAT UP!

Mangia! Mangia!


If you want to dress up this simple recipe:
  • Add roasted or sauteed veggies
  • Add chicken or tofu for protein
  • Use flavored pasta (I used "Sweet Basil Trenette, in the photo's posted)
Time saving tip:

Use jarred/minced garlic.  If you are like me and keep these cheater jars around,  just make sure you blot out the moisture some prepared minced garlic has as this will cause your oil to pop and splatter during cook time.  OUCH! I don't want you to get burned. 

I hope you enjoy this simple recipe and as always; let me know if you have any questions and what you think, when you give this a try!

Tuesday, November 8, 2011

SOUPER Easy~Cabbage Patch Soup

As promised I want to share some recipes that utilize Fall Seasonal Fruits, Vegetables and Herbs *see 11/9/2011 blog entry for a list*.

Today it's all about Cabbage Patch Soup.  A soup that is easy to make, economical, healthy and sooo tasty.  I am giving you a SOUPER size recipe so that you can have not only one meal but also some leftovers to stick in your freezer for another day.  Another option for leftovers: I LOVE giving home-made treats/gifts to my friends and a container of soup and a loaf of artisan bread is always smiled upon.

Who Wants Some Soup?

A really great thing about this recipe is that it is easily converted to "vegetarian" and if you omit the potatoes as well, this soup has now become a "zero calorie" menu item.  What that means is that your body will burn more calories digesting the soup then is actually in it.  However, it is so full of vitamins and fiber I really don't feel guilty having mine with the potatoes in it.

One last note before the recipe and it is something I will say often.."This is how I make it but don't be afraid to make it YOUR own"!  Whether you omit or add some veggies to what I have listed, don't be afraid to play with recipes.  Beyond the cabbage, tomatoes and spice I never make this soup the same way twice.

Cabbage Patch Soup

You will need a LARGE stock/soup pot for this recipe. The vegetables will cook down so don't be to alarmed with the amount of raw vegetables you have.

Ingredients:
  • 1 lb. Ground Beef
  • 3 Cloves Garlic, Minced
  • 2 C. Chopped Onion
  • 1/2 C. Chopped Celery
  • 1 C. Chopped Zucchini
  • 2 Cans (16 OZ.) Kidney Beans, drained and rinsed.
  • 1 Can (28 OZ.) Stewed Tomatoes
  • 1 Small Head Cabbage, chopped.
  • 1 Packet Taco Seasoning
  • 1 Small Head Cauliflower, broken into florets
  • 1 lb. Potatoes, cubed
  • Vegetable, Beef or Chicken Stock (Approx. two 32 cartons)
  • Salt and Pepper to taste
  Directions:
  • Brown Hamburger with garlic and onion, drain any excess fat, set aside.
  • Chunk up cabbage and remaining veggies into one inch size pieces, break down cauliflower into florets (this will help them cook evenly).  You don't have to be concise, this is a rustic soup. *smile
  • Pile veggies, meat mixture, beans, tomatoes and spice packet into your soup pot. Add in stock.  You will want the stock to just cover all your ingredients.  If you are short of stock just add a wee bit of water. 
  • Bring soup up to a light boil and then turn heat down and let simmer till veggies are done but still firm.
 
Don't forget to taste as you cook; halfway through cook check your flavors, add salt and pepper as needed.  If you want a bolder flavor you can also add a cube or two of bouillon.
Top with shaved or grated parmesan and a drizzle of extra virgin olive oil, serve with a loaf of artisan bread and you are ready to eat. Forget slicing your bread, there is something really fun about tearing/breaking the bread as you sit and enjoy your soup as a family!
  
Time Saving Tips:
Use frozen, peas, beans, carrots, corn....whatever! ....for some of your veggies.
Use your slow cooker.  This is a great recipe for the slow cooker.  You can brown and add your hamburger before or after cook time.

Please note that all recipes are original to Cobwebs To Cookies. I love when my recipes are passed along and shared; but ask that you please respect the time and energy I put into developing them, by sharing this blog as your source if you do. Thank YOU!

Monday, November 7, 2011

Cornucopia of Crunch! ~ What's In Season, Fall Fresh Fruits and Vegetables

Next to Summer; when I look forward to fresh berries and all things "Garden", like tomatoes plucked from the vine and devoured before you make it back to the house. I love the Fall and the cornucopia of wonderfulness that this time of HARVEST brings.

                                                                                           Photo by:Woolanthropy
Truth be told, we are pretty spoiled here in America and can find most vegetables, fruits and herbs that we want, year round at our grocery story.  BUT! every vegetable, fruit and herb has a "natural" season when it is at it's best and that is the time you want to grab'em up and enjoy.

Below is a list of Fall Season, vegetables, fruits and herbs.  Please stay tuned over the next few weeks for recipes that incorporate this bounty of tasty treasures.  Also, feel free to share some recipes YOU enjoy that feature Fall vegetables, fruits and herbs.

OH! and don't forget, our taste buds are constantly changing.  The YUCKY veggies of your youth may turn into a new favorite if you give them a try!
  • Apples~Available year round, we forget that Fall Time is Apple Time!  At their best and brightest and with unique varieties at hand, now is the time to "Apple A Day"!
  • Artichokes~TAKE TWO!  Artichokes have both spring and fall harvest times.  Start melting the butter.
  • Arugula~Still available for the next month or so, a peppery green that goes great with beets. Speaking of..
  • Beets~Earthy and sweet, a great addition to any salad, made into soup or create a relish to have on your Oktoberfest Braut.
  • Broccoli and Broccoli Rabe~Fall harvest means less bitter, sweeter and more tender greens.  Anyone for broccoli cheddar soup?
  • Brussel Sprouts~Best when you can buy them on the stalk, TRY THEM!  Roasted and tossed with bacon or prepared "green bean casserole" style.  So good for you and worth a second try for those of us who turned our nose up at them as kids.
  • Cabbage~Such a versatile veggy!  Cooked or raw the more cool exposure it has the sweeter cabbage gets, kind of like "late harvest wine grapes", this effect is called "frost kissed".
  • Carrots~Now is the time when, like apples, you are going to see special varieties of carrots that are sweet and juicy.  Great in cakes, soups and fresh squeezed juices...EAT UP!
  • Cauliflower~Mashed with potatoes, "Frosted" *please ask for recipe* or in a "Chop Salad" a great source of Vitamin C.
  • Celeriac/Celery Root~Ugly to look at but so yummy to eat!  I love Celery Root Soup *please ask for recipe*.
  • Celery~My mom loves celery! She puts it in her soups and stews.  I am a BIG fan of raw celery as a snack or chopped up in chicken salad.
  • Chard~ A super food, chard is packed full of vitamins.  My favorite way to eat it: clean and chop chard, fry 2-3 pieces of bacon, remove bacon and add chard to bacon grease, cook till tender and top bacon crumbles!
  • Chile's~Warm up your palette with some Chile's!  Now is the time to harvest and dry or enjoy in salsa and other dishes.
  • Cranberries~OH YEAH!  We are already on our second batch of home-made cranberry relish.  Great for decorating and great for eating! Cranberry relish is great as a dinner side, on sandwiches or vanilla bean ice cream.
  • Edamame~Late Summer, early Fall, a big bowl of these fresh soybeans are a fun and healthy snack or appetizer. Boil in the shell and toss with a wee bit of melted butter and some sea salt. They also make a great addition to succotash.
  • Endive/Chicories~Including *escarole, curly & belgian endive, radicchio* This is when they are at their best! Any other time of the year you are getting "forced" production..and hey, who likes anything that is forced?!
  • Eggplant~Also late Summer, early Fall, these beautiful jewels are crazy good, breaded in eggplant parmesan or diced up in minestrone.
  • Fennel~If you like licorice you will love Fennel.  Roast it, saute it, chop it in a salad.
  • Figs~Like artichokes have two harvests.  Keep your eyes peeled right before Thanksgiving they will make an appearance. Stuffed figs, figs wrapped in prosciutto...OMGOODNESS!
  • Garlic~YUP! it has a season and now is the time.  Who doesn't love roasted garlic spread on fresh bread? It stinks up the house in such a good way.
  • Grapes~Scrumptious orbs of juicy goodness. Try popping a few in your green salad tonight.
  • Herbs~Hearty herbs like rosemary, sage, parsley and thyme are in season.  Great for everything on your Fall menu.
  • Horseradish~A root veggie, it joins the rest of the dirt dwellers that are now ready to be dug up and enjoyed.
  • Kale~Beautiful frosty green leaves, you often see Kale used as a garnish in your local deli case.  This hearty green is also so good to eat, tasty in soups and is full of..yup, you guessed it! VITAMINS!
  • Kohlrabi~Not quite yet, but late Fall and early Winter, snatch up this uber crunchy green or purple veggie for your salads or make into a slaw.
  • Leeks~Mmm this mild flavored "onion" is a great add in to your saute, stir-fry or soup.  Try sauteing up so leeks then add in some heavy cream, butter, a splash of white wine, salt and pepper. Reduce sauce down and spoon over broiled or barbecued salmon.  Then get back to me when you are in HEAVEN! 
  • Mushrooms~As cold damp weather increases, so increases the conditions that mushrooms thrive in.  chantrelles are my favorite Fall FUNGI!
  • Okra~While it needs HOT weather to thrive in it's growth, you will still find plenty of plump green pods to add to your gumbo in the early part of Fall.
  • Onions~While cultivated year round, fall is harvest time. Where my parents live in Idaho there are so many onions being transported right now it is not uncommon to find a stray, or two or three by the side of the road.  A tasty bowl of french onion soup, is the kick-arss way to ward of the sudden chill in air..mmmmm.
  • Parsnips~This cousin to the carrot is great roasted.  Make sure you go for slender parsnips as they are the most tender.  Larger parsnips develop a "woody core" that you will want to remove as you would an apple core.
  • Pears~I adore pears!  In my salads, eaten as a snack, poached with chocolate sauce, juiced, in a tart... the list goes on, YIPEEE it's pear season!
  • Peppers~Both sweet and spicy have come into their vibrant, sweet goodness right now. Red, Yellow and Orange peppers retain their sweetness when cooked while Green peppers can turn a wee bit bitter.  All are full of antioxidants and vitamins so EAT UP!
  • Persimmons~OK, I have only had this fruit once, when I lived in Los Angeles.  Asian in origin here is a wee bit more information on this fruit: http://www.nutrition-and-you.com/persimmon-fruit.html
  • Potatoes~Believe it or not the potatoes you eat in the Winter, Spring and Summer have been harvested in the Fall and kept in cold storage.  This Idaho girl loves potatoes and when eaten in moderation, this is a good carb to have as part of your daily diet.
  • Pumpkins~SURPRISE! *wink* But, how many of you eat as well as carve your pumpkins?  My husband is a huge fan of toasted pumpkin seeds but I admit, that is about all I do with fresh pumpkin. This is a great article which shares not only how easy it is to cook pumpkin but also shares the health benefits of this GREAT PUMPKIN! : http://lowcarbdiets.about.com/od/whattoeat/a/pumpkin.htm
  • Quinces~I have never had a Quince or anything made with this fruit. I know they are relative to apples and pears like their cousins, their flavor evolves as they ripen.  If you would like to know more about this fruit, check out: http://www.wisegeek.com/what-is-quince.htm
  • Radishes~While a few radishes are ending their season, don't fret you can still get peppery, crunchy diakon variety radishes in the Fall.
  • Rutabagas~Not only a very fun thing to say "Rutabaga, Rutabaga, Rutabaga"! but also a tasty nutritious root vegetable that has a buttery, nutty taste and like all root vegetables is AMAZING when roasted.
  • Spinach~is in season in cooler climates.  How about a cheese and spinach quiche for breakfast, lunch or dinner?
  • Sweet Potatoes and Yams~NOT the same thing!  But both are on hand this time of year and there are many ways to prep and enjoy them. There is the traditional way with marshmellows but don't miss out on the new craze of sweet potatoe fries, so good for you and so tasty. Don't stop there! There is a multitude of sweet potato and yam recipes at your finger tips just 'search'.  For more info on what separates the potatoes from the yams, check out:
  • http://homecooking.about.com/od/howtocookvegetables/a/sweetpotatodiff.htm
  • Tomatillo's~Cute baby green tomatoes swaddled in a thin paper husk, these little guys make the best salsa!  Cut them up and use them fresh or roast them to add depth of flavor.
  • Turnips~Worth their weight, maybe not in gold but when buying this root veggie, do pick ones that are "heavier" then they look to get the best flavor.
  • Winter Squash~OH MERCY, where to start?!  This might be a separate blog.  At the end of the summer the squash has grown and is ready to be harvested and stored in a cool dry place, enjoyed throughout Fall and Winter. I love acorn squash with a drizzle of balsamic reduction and freshly shaved parmesan.  Don't get me started on my love affair with butternuts. 
  • Zucchini~Like squash, these veggies burst forth at the end of the summer and many of us have more then we anticipated on our hands.  Don't forget that zucchini can be shredded and frozen to be used in sauces, cookies, cakes and breads.
I hope this list will help you pick some tasty treasures to enjoy "IN SEASON"!  Don't forget to keep your eye's peeled (pun intended *smile*) for some recipe that incorporate a few of these veggies that might be "new to you".  Please feel free to ask me for recipes, I love any excuse to get lost in my cookbook collection.

Thursday, October 13, 2011

FALL FOOD ~ Cinnamon Roasted Chicken

BREAK OUT THE CINNAMON!

Am I the only one who starts CRAVING cinnamon when Fall hits?  I don't think I am alone because as I drive down the street, I see espresso stands advertising that "Egg Nog and Pumpkin Spice" are "NOW AVAILABLE"  *smile*.

A fun way to bring cinnamon into the savory side of your life is by making Cinnamon Roasted Chicken.  This recipe was inspired by an episode of "Little House on the Prairie".  In the episode, Nellie Olsen wants to impress Almanzo Wilder by "cooking" him dinner. So she asks Caroline Ingalls to be her stunt cook and hide in the kitchen so Almanzo will she has cooked the meal herself.  Laura Ingalls can't have that, SHE loves Almanzo! So she devises a plan and volunteers to do the cooking. Instead of cinnamon Laura uses cayenne and needless to say Almanzo and Nellie's evening is cut short.  SOOOOO, when making this recipe, unless you like it spicy, make sure you grab the cinnamon not the cayenne!

Before I give you the recipe I want to explain why I use chicken that has the skin on and is still on the bone.
1. It is far less expensive when you buy it in store, usually a difference of $2.00-3.00 per lb.
2. Roasting on the bone and with the skin on is going to give you JUICY chicken every time.  If you are watching calories and don't want the skin, just take it off when you are done cooking, but leaving it on helps trap all the juices inside.  Trust me on this one! 
3. The bones!  Whether with this recipe where the bone is left on during cooking; or another recipe where you de-bone the chicken before cooking, those bones put in some water with a few seasonings makes AMAZING chicken stock to be used for steaming rice, in soups..etc.  Another money saver and really easy.

PLEASE promise to ask me if you have questions about how it is "easy".  I know before I learned how to cook certain things, it seemed daunting or time consuming.  My goal is to show you how easy it is to cook great food and to save you money when doing it.  MY email is always open!  :)

Roasted Cinnamon Chicken

Preheat Oven 375 Degrees.
  • 4~ Bone In Skin On, Split Chicken Breast  (They usually come split, if buying from butcher ask him to split it for you)
  • Olive Oil
  • 2 Tb. Melted Butter
  • 4 tsp. Kosher Salt
  • 1 1/2 tsp. Ground Pepper
  • 1 1/2 tsp. Cinnamon or Allspice (This is for Sharon Sowell: you can substitute Allspice if you are allergic to Cinnamon)
  1. Mix dry spices together
  2. Wash and pat dry chicken breasts.  *(Use paper towels for this)
  3. Gently left on side of chicken skin, creating a pocket between skin and chicken, sprinkle a healthy pinch of dry spices in pocket and using your fingers spread around. Repeat with the remaining pieces.
  4. Place chicken an inch apart on  baking sheet and drizzle each piece with olive oil.  I would say approx. 1/2 TB. per piece.
  5. Sprinkle Remaining dry spice over chicken pieces and rub in. 
  6. Pop in oven for 20 minutes then drizzle chicken with melted butter, cook an additional 20 minutes. 
  7. Turn oven up to 400 Degrees and move chicken to top rack for 5-10 minutes. This will really crisp up your skin if you are going to eat it.
  8. Take chicken out of oven and let rest 5-7 minutes. 
  9. ENJOY!
Yummy pan drippings make great gravy!


A few tips:
  • I serve this chicken with plain mashed potatoes and gravy I make from pan drippings. Wild rice with craisens and walnuts is also a good "starch" then add whatever veggie you are craving that night and you have a KICK-ARSS meal.  Roasted squash is great side with this recipe. 
  • Please note if you substitute boneless skinless chicken breasts in this recipe you will want to adjust your cook time.
  • I am a big fan of pan searing my chicken before I roast it.  However, with this recipe you want to avoid that as cinnamon burns easily.  Skip the searing with this recipe.  :)

* To wash chicken: Lay out double layer of paper towels, rinse each piece of chicken under cold water and place breast side down on paper towels, let sit for 2-3 minutes then use more paper towels to pat dry rib side of breast.  This is important as it allows the oils and spices you use to adhere to the chicken!

Thursday, October 6, 2011

Ch, Ch, Chili Cream Cheese Chimichanga's!

Here in The Pacific Northwest, Fall has hit!  One of the first things I do every Fall is make a ginormous pot of chili (scroll down a few posts to find a simple chili recipe)!  First night chili is good, second night even better, as the chili thickens up and the spices have totally developed. Basically with soups, stews and chili's, the more you cook them, the more flavorful they get!

I never really get tired of chili but I like variety and after one or two nights, I like to change things up.  So I will usually take what chili I have left and put it in the freezer for another time or try to come up with a creative way to "recycle" it into something NEW later on in the week.

OK, I know the word "recycle" might have thrown a few of you, but think about it.  You are taking something you already have and rather then tossing it you are making it into something new.  I actually love the term "recycle" when it comes to food, as it means I am cutting out any waste, which stretches my grocery budget, gotta love that!  It also forces me to be creative, which I LOVE as that usually results in a new recipe. 

One of the ways I recycle a wee bit of chili, is by making it into Chili Cream Cheese Chimichanga's.  I LOVE, LOVE, LOVE, LOVE Mexican food and chimichanga's are one of my favorite things. You can make just about anything into a chimichanga but before I get ahead of myself and start listing some of them, let me outline how I make Chili Cream Cheese Chimi's.

The Tortilla:  Flour tortilla's can be found in your grocer's Hispanic food aisle or on the end cap of an aisle.  You can use either burrito size or regular size tortillas, it just depends on how big you want your chimi's, I generally use the burrito size.  If you use regular size tortillas, you will want to steam them a wee bit so they are more pliable and do not tear as you fold your chimi's.
*Healthy Option: Use Whole Wheat Tortilla's.

The Chili Filling: Leftover chili or leftover chili and rice, either one works.  Adding rice will help stretch your chili or thicken it, if needed.  I generally steam long-grain rice in broth made with "Knorr" brand, tomato and chicken bouillon or home-made chicken broth.  I mix two parts chili to one part rice, but again, you can do whatever works for you.  You are going to use a HEAPING cupful of filling for burrito size tortillas or 1/2 to 3/4 C. for smaller tortillas.  You are also going to want to work with cold chili, it is much easier to manage during assembly.  :)
*Healthy Option: Use Brown Rice and Turkey or Chicken Chili.

The Cream Cheese: Pretty self explanatory, add as much or as little as you want.  When I use burrito size tortillas, I use 4 OZ. per chimi.  The cream cheese is going to add a pop of flavor, a creamy somewhat cooling effect, much like what you find in a cream cheese jalapeno popper.  Sometimes I will dice up some pickled jalapenos into the cream cheese for a little extra kick!
*Healthy Option: Use Low fat Cream Cheese.

Garnish:  The chili already has a lot of flavor so I keep my garnish simple, things I would put in a bowl of chili.  Fresh pico de gallo and sliced avocado is how we roll.  You could also add sour cream but we find that the cream cheese adds that creamy element and sour cream is not needed.

*Using the healthy options I have listed will still result in a real tasty chimichanga, that is one of the great things about the flavor profiles that chili has, anyway you twist it, it is still GOOD!

Now! Let's assemble and cook, so you can enjoy!

  1. Preheat Oven to 375 degree's.
  2. Prepare baking sheet by drizzling with  4 TB. of vegetable oil, set aside.

3. Spread cream cheese in center of tortilla.
4. Add desired amount of chili filling .
5. Fold side of tortilla over filling, tuck it up tight like your swaddling a babe.
6. Fold bottom half of tortilla up tight over side folds and then give a final roll.
7. Place on cooking sheet and carefully roll them around to coat them in vegetable oil. 
They will look like this!
*In restaurants they deep fat fry them. You can also do that, but I prefer the baking method as you can do more at once and it is a healthier option*.
8. Bake for 15 minutes in preheated oven and then flip and cook for an additional 15. 
9. DONE~TA-DA! Chili Cream Cheese Chimichanga's and YOU made'm!

 Now, about the other types of  chimi's I mentioned earlier.  I love to use leftover pot roast in chimi's, spiced with salsa it is a really great way to "recycle". You can also slow cook a cheap cut of beef in salsa or canned tomatoes and spices for your filling.  Chicken chimi's are my FAVORITE and poaching a whole chicken or less expensive legs and thighs in garlic, chile powder, salt and pepper is a killer choice for stretching your grocery budget.  Mix in grated cheddar or monterey jack cheese to your beef or chicken.  This mixture is going to take the place of the chili in this recipe.  In lieu of cream cheese, use refried or whole beans.  Serve with a salad and rice.  GREAT meal, super easy, inexpensive and cooked in the oven instead of deep fat fried, pretty darn healthy!
Please feel free to ask me any questions about this recipe or other "recycle" ideas listed below.  For sure let me know what you think when you try any of my recipes.  I love feed-back!

Other ways to "recycle" chili:
  • Chili Cheese Nachos
  • Taco Salad
  • Chili Omelet
  • Hot Dog Bar Addition
  • Chili Pot Pie (In 8x8 baking pan fill half way with chili.  Pour prepared corn bread mix over chili and bake at 375 degrees for 35-45 minutes). *I use one box of jiffy brand mix*
  • Chili Stuffed Peppers (Use chili/rice combo from recipe above. Layer mixture with cream cheese in peppers and top grated cheddar cheese.  Pop in oven at 375 degrees for 35-45 minutes)
Please note that all recipes are original to Cobwebs To Cookies.  I love when my recipes are passed along and shared; but ask that you please respect the time and energy I put into developing them, by sharing this blog as your source if you do.  Thank YOU!